Importing PROIV objects |
DEVELOPER |
Importing PROIV objects |
DEVELOPER |
The Import utility allows you to import PROIV objects in one of three input types such as vpx(PROISAM file), par(PROIV Archive), or a directory containing JSON Object files / individual JSON Object file which were exported using the Export utility from the same or a different machine. Refer JSON Export and Character Encodings other than UTF-8 for additional information.
The objects which are associated with the file are usually Functions, File Definitions, Dictionary (as part of File Definitions), Global Logics, Tasks, Value Variables, ActiveX Controls (the PROIV definition of the controls, not the controls themselves), Server-Side Objects (the PROIV definition of the objects, not the controls themselves), Control Bars, Action Controls and Global Messages. You can import these objects individually as selected from a list, or as complete file with all objects associated.
Import Mechanism:
If a JSON directory is selected, it scans for all JSON Object files and these are available for import with subject to the selection criteria specified in the Import utility screen. For example, if the directory does not contain Task or Global Logics, then the associated check box options for those object types appear as disabled. However, in case you select an individual JSON object file, it just imports the source for that individual object.
|
Note: Unlike a source vpx file, there is no run-time specification included within a JSON object file, therefore if required, the imported object will need to be built prior to execution. This is applicable to both individual and directories of JSON object files. |
If a "par" file is selected, then the contents of the archive are available for import, the actual objects that are imported are subject to the selection criteria specified in the Import utility screen. Run-time specifications for the objects selected are additionally imported from the runtime vpx file embedded in the archive where appropriate to the object type.
To import a PROIV object:
Click the Tools tab, on the General Tools, click Import.
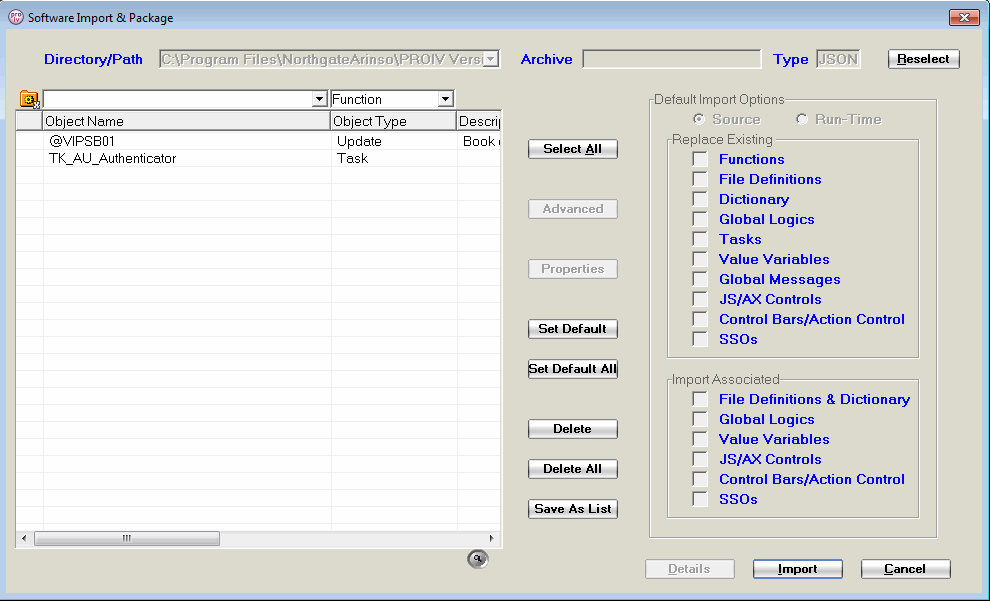
The Software Import screen appears.
To select the objects for import, do either of the following:
To select all objects, click Select All.
The import list loads all the objects of the exported file.
To select individual objects, click the check box of the respective objects, as required.
For more complex selections, click Advanced.
This allows you to generate a list from complex selection criteria or saved lists or work lists.
|
Note: If any objects cannot be imported (for example, the selected object is open for edit), they are placed in the failures list. At the end of the import process, the list of failed objects appear, which you can optionally print and save as a named list. |
|
Field |
Description |
||||||
|
Directory/Path |
For a clean installation, by default, the PROPATH directory appears. The value in this field determines the configuration which is set in the Default Paths. You can also browse and select the file or folder as required. The list of objects appear under Object Names. |
||||||
|
Archive |
Represents the name of the file which is to be imported. |
||||||
|
Default Import Options |
Displays a list of objects which you can choose to replace and include into the import list during the import process.
|
||||||
|
Set Default |
Resets to default value of any individual (or multi-selected) objects. |
||||||
|
Set Default All |
Resets all modified values of the objects to default values. |
||||||
|
Delete |
Deletes the selected objects from the list. |
||||||
|
Delete All |
Deletes the list. |
||||||
|
Save As List |
Saves the list. Enter the name of the list and a description. If you wish to edit or overwrite a list choose it from the drop-down box and select the appropriate radio . |
||||||
|
Details |
Displays list of objects which are imported. |
Click Import.
The Import process completes and a message appears to indicate success or failure.
|
Note: During the import process, if it is detected that an object is being imported and the destination JSON file exists then the import of this object is skipped and an error message appears. In practice, this should not occur during import to a PAR file or UNIX file system even if there are objects which equal when compared case insensitively. However, it may occur on windows as NTFS does not allow for case sensitive names. If the destination file cannot be created because it has file system reserved characters in the name then an error message appears and the import of that object is skipped. Refer Object Naming Level for more information. |
Topic ID: 500203