A Short Function Development Tutorial |
DEVELOPER |
A Short Function Development Tutorial |
DEVELOPER |
This topic will guide you through the basics of function development using the function TS_DET (Time sheet amendment by week screen) as the starting point.
Open this function and create a backup by clicking the ![]() toolbar option (Enter ‘before my change’ in the notes field and click
the new backup ).
toolbar option (Enter ‘before my change’ in the notes field and click
the new backup ).
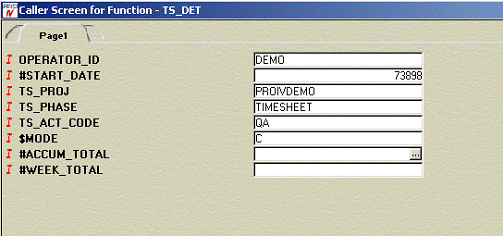
Build and execute the function by clicking ![]() toolbar option, which will also create an interface wrapper, as this function
is a global. The screenshot below shows the interface wrapper for TS_DET.
Enter the data as shown and the screen will open displaying data.
toolbar option, which will also create an interface wrapper, as this function
is a global. The screenshot below shows the interface wrapper for TS_DET.
Enter the data as shown and the screen will open displaying data.
For the purposes of this section always use the data shown for testing. |
Interface Wrapper for TS_DET
After entry of the parameters click the run or use the (Alt + R) hot key to call the function.
The next screen shows the data also supplied with the demo system. We are going to add a feature to this screen that allows all internal days to be set to a value as well as the ability to set the value that will be applied.
This will involve the addition of two graphics to this screen with some associated processing logic and the creation of a new Global Function providing a pop-up entry screen.
TS_DET execution
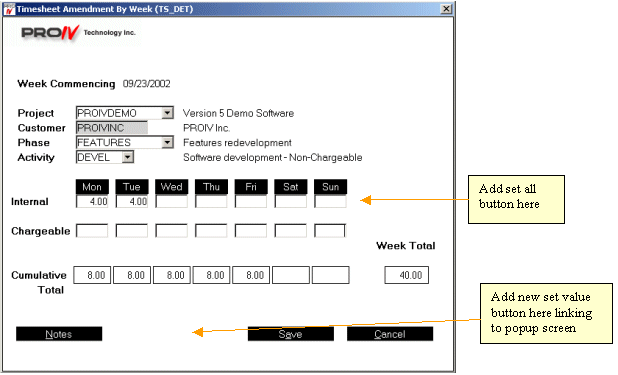
Click cancel to return to the wrapper displaying the output state of the parameters followed by the Exit or (Alt + E) hot key.
We will create the Global Function to be called as a pop-up first and then amend the above screen.
Click open object toolbar ![]() and select the new tab.
and select the new tab.
A panel will be displayed showing the available objects that can be created by PROIV Developer.
Select Flat Screen by clicking the appropriate graphic and a pop-up detail will be displayed.
New Flat Screen details
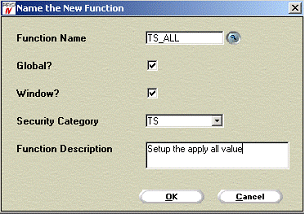
Enter the details as per the screen above and click OK or (Alt + O) to create the new function. Notice that this function is checked as both Global and Window. This will create a skeleton screen function with a Window Cycle and default field, which can be called from other functions.
These default objects can now be seen in the structure view displayed for the new function. We can now start to create our required functionality starting with the Cycle properties.
Double-click in the object called DefaultCycle to open the property sheet and add/change the following attributes on the specified tabs:
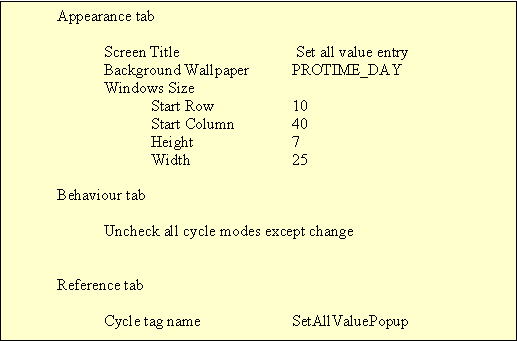
The above reference format makes for identifiable objects and is worth the effort. |
Close the property sheet and click the expand symbol ![]() select the DefaultField object with a single
click. This will be the place after which we will insert new fields.
select the DefaultField object with a single
click. This will be the place after which we will insert new fields.
Now click the add new object toolbar ![]() which will open
the Add Objects window. The left hand side of the screen is used for object
selection and the right hand for displaying the current fragment being
built for addition into a function.
which will open
the Add Objects window. The left hand side of the screen is used for object
selection and the right hand for displaying the current fragment being
built for addition into a function.
From the dynamics tab select Editbox and click the insert below . Now select a holding field and click Insert Below .
Add Objects Window
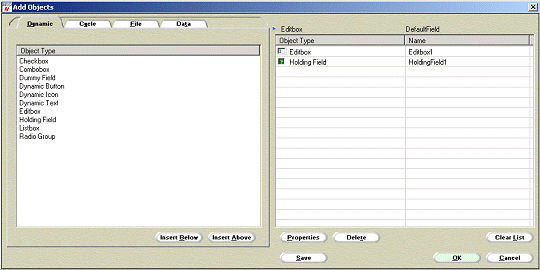
The holding field is to be used to stop this simple screen from closing, as our field to hold the value is not mandatory. We will use an OK to save the value and dismiss the screen.
We can set the properties for the objects being added in this screen by selecting an object in the right hand list and clicking the Properties or by double-clicking n object in the list.
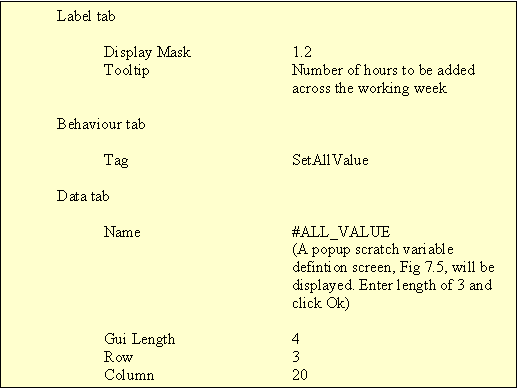
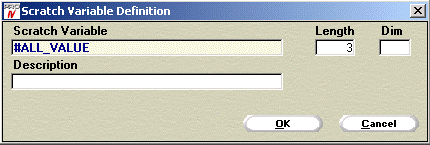
Change the Editbox properties as follows:
Scratch Variable Definition Window
Now click the green OK to insert the new fragment into your function.
We will now add the Static objects of a label description for the field and the OK.
Click Statics tab (Alt + T) to open the view and select the SetValuePopup cycle, a blank page will be displayed.
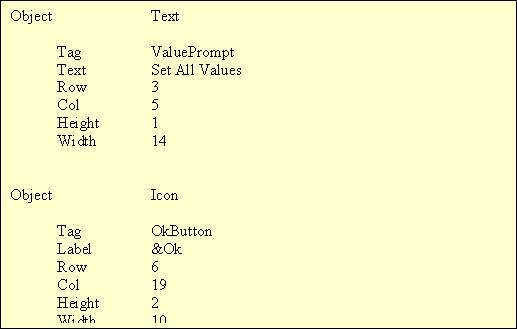
Add the following two objects and values into this screen:
You should now have a Statics screen similar to the screen shown below. We will now refine the objects using their property sheets.
Statics Screen
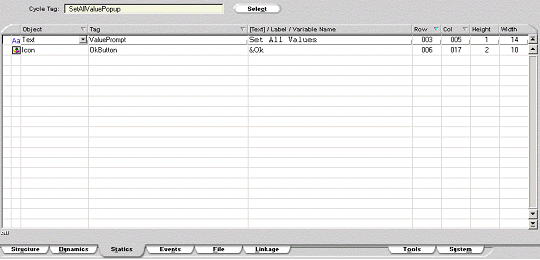
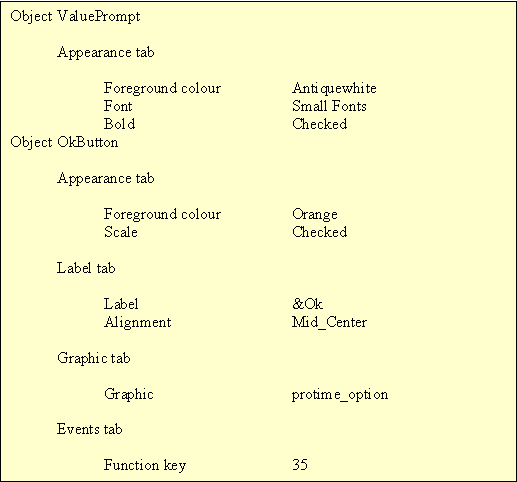
Select Change mode and double-click on each object in turn and set the following properties:
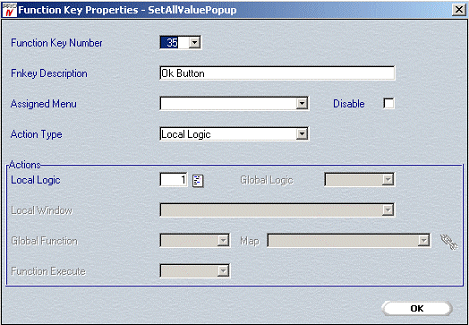
On the Events tab, click on the ![]() symbol
to open the Function Key properties.
symbol
to open the Function Key properties.
Add a description for the key, i.e. OK Button and select an action type
of Local logic. Now click on the ![]() symbol
to open the logic editor for this event.
symbol
to open the logic editor for this event.
Function Key Properties Window
The Logic Editor will be displayed with no logic selected, to generate the next available Logic ID, press the ENTER key.
Add the following logic lines to the Function Key logic.
@#COM9 = #ALL_VALUE
LSEXIT
This will store the entered value and exit the window when the OK is clicked.
Close all of the property screens and return to the view. You should now be able to test your new screen by clicking the Build and Execute Current Function toolbar option. A window should be displayed in which you can enter a number and click the OK to exit.
On clicking OK, you will be returned to PROIV Developer and by selecting the System view and checking the Display Comm Variables option you should see that your entered value has been stored in Comm Variable 9.
We are now going to change the original TS_DET function to call our new Global screen, and apply the set values by adding two Static s. We will use the Forms Designer to lay out the new objects and set their properties.
Open the function TS_DET using the Open Function option as described earlier. You may select the function from either the recent tab, which displays the last 30 items edited or from the booking tab, which displays the functions currently, booked out to you.
The function will
not be listed in the Open Object window,
Booking tab if auto book is enabled
|
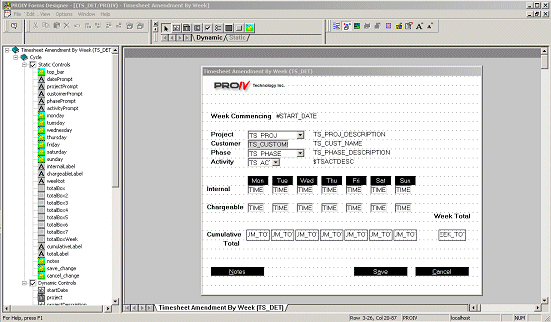
From either the Structure or Dynamics view, select the Forms Designer from the toolbar. The screen appears as it would appear at run time, with a list of objects in the selected form shown in the tree on the left hand side.
Forms Designer
First we will copy one of the existing s to create our Caller by selecting the Notes (clicking on the object in the right hand canvas area) and copying it to the Windows clipboard (CTRL C or Edit + Copy from the drop-down or right-click menu).
Now, place the cursor where you wish to place the new object, right-click and select Paste option. A copy of the original will be displayed on the canvas, which may then be left-click dragged to the desired location.
By right-clicking the new object, you will be able to access the objects properties which should be set as follows:
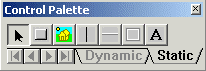
We will now create a new Static icon to set the values on our screen. Open the Control Palette (from the View menu if not currently visible) and click on the Icon on the Static tab.
Move the cursor to the canvas where it will change to a cross and right drag a rectangle of 4 characters wide and 1 line high next to the internal time field for Sunday. The dot grid displayed on the canvas represents the character positions. A default graphic will be displayed in the painted rectangle.
Control Palette
Right-click the new icon object and set the following properties:
Your screen should now look something like the screen shown below, if the positions differ you may select objects and move or resize them.
Screen Design

Select the Exit option from the file drop-down and confirm the Save Changes screen. The function changes will now be sent back to PROIV Developer and incorporated in the Edit function.
We now just need to provide the logic for the Function Key events of our new buttons.
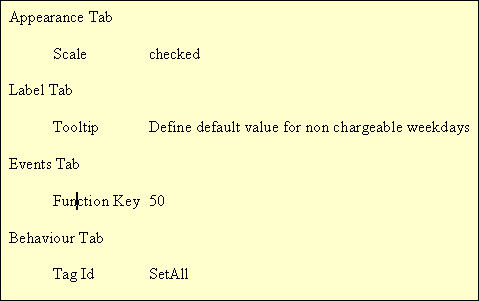
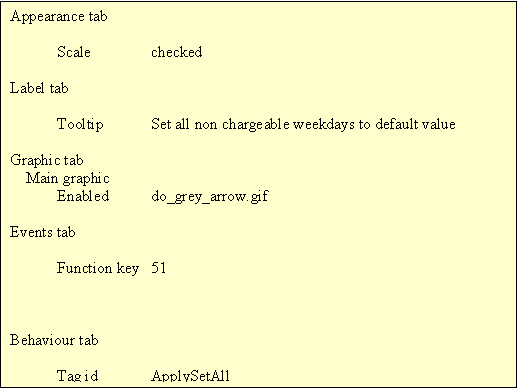
Select the statics view and select the cycle, all of the objects will be listed. If you click on the Tag title bar the list will be resorted with our new icons ApplySetAll and SetAll at the top.
For SetAll open the properties and select the events tab. Click on the Function Key property . As before create a description (Call set value screen) and an action type of Local Logic.
Click Logic icon and return to create a new logic with the following line:
GLOBAL_LSCALL(TS_ALL)
Now repeat the process for the ApplySetAll icon adding the following logic lines:
FOR #I = 1 TO 5
TIMECARD_HOURS(#I) = @#COM9
ENDFOR
hours1.Refresh()
hours2.Refresh()
hours3.Refresh()
hours4.Refresh()
hours5.Refresh()
The #I variable will be prompted for size and should be created with length of 1.
The function can now be built and run using the interface details shown above The new screen should be displayed on clicking the Set Value , and the value should apply to the Monday to Friday days when the Set is clicked.
In the above example, the function edited by the Forms Designer had only a single Cycle.
If a larger function is being edited two options are available to the developer:
By selection of the Function in the Structure or Dynamics views, all cycles in the function will be sent to the Forms Designer. This may take time as more data has to be passed and could be considered wasteful if only a small subset of the function is to be edited by Form Designer.
By selection of any other object in the function, the logical form will be calculated and sent as a fragment of the function. This is a much faster and more targeted approach to editing screens.
If you want to change the type of an object, e.g. an editbox that provides access to a window is to become a combo box, the Dynamics view has the facility to morph an object.
This is accomplished by selecting an object within the Dynamics view and clicking on the graphic that represents the object. A pop-up window will be displayed allowing selection by a double click of an alternative type.
Topic ID: 500025