


Mapping the PROIV Printer |
DEVELOPER |
 |
Mapping the PROIV Printer
Next, you’ll map the PROIV printer to a Windows Client printer.
-
From the Client, select the menu sequence View | Printer Mapping.
The Printer Mapping Setup dialog box displays
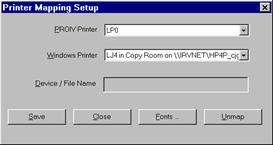
Client’s Printer Mapping Set-up window
-
From the PROIV Printer combo box, select the report device name that you specified in the System Report Device Name field in $SYSDEF.
In the mapping example above, for the report device name LP0, the logical device is LP2. PROIV Printer LP0 is mapped to the printer specified in the Windows Printer field in the Printer Mapping Set-up window. When you direct output to PROIV Logical Device LP0, it will be printed on the printer specified in the Windows Printer field. -
From the Windows Printer combo box, select the name of the Windows printer to be mapped to the PROIV printer.
- To select a file as output, click the combo box arrow and choose FILE:, then enter the file name in the Device/File Name field.
- To select a printer and retain its Control Characters as defined in the report, click the combo box arrow and choose Device:, then enter the printer name in the Device/File Name field. (See Issues Using Printer Escape Sequences in Reports, page 102)
-
The name of the device or file you specified displays in the Device/File Name field.
 |
Note: The Number of Copies and Fit to Page options are not available when printing to Devices or Files from the Client. |
-
Click Fonts… to specify the font used by the current printer mapping. If you do not specify a font, the current mapping uses the Proportional Font and the Monospaced Font defined in the Client’s Palette property sheet.
-
Click Save to save the current printer mapping.
-
Repeat the step 1 through 5 for each printer to be mapped.
-
When you have mapped all the printers, click Close.
Topic ID: 730080