Open Client Paging Area Overview |

Open Client Administration |
 |
Open Client Paging Area Overview
The Paging Area in Open Client has been enhanced in a variety of ways. The functionality is configured in the PROIV MFC Client (some features can also be configured in Open Client) and is implemented when you deploy your application using the Open Client technology.
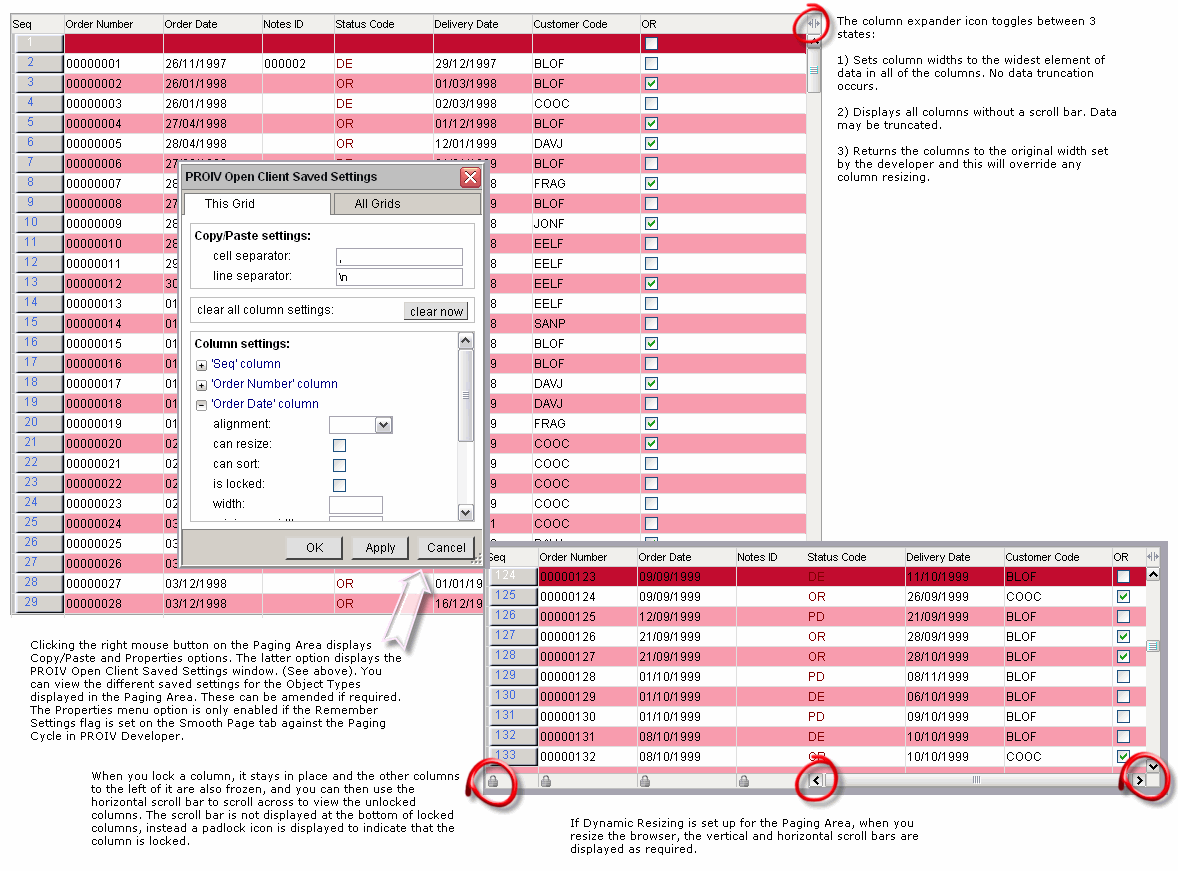
Click here to see an explanatory screenshot of the new look Paging Area.
Horizontal Scroll Bar
Paging Screens can now display a horizontal scroll bar in the Paging Area. This enables you to add more columns than would normally fit into the Paging Area, and you can use the scroll bars to move the Paging Area left and right to see all of the data in the Paging Screen. When the option is selected, the horizontal bar appears in all modes. You can enable the functionality by selecting the check box on the Paging tab of the Paging Screen Cycle Properties window, in the Open Client section or by enabling the HorizontalScrollBar property in logic. The scroll bar appears when needed, i.e. when the extent of the data in a window exceeds the width of the visible window.
Scroll Bar Position
The scroll bar is placed at the bottom and inside the Paging Area, it has width equal to the width of the scrollable columns in the Paging Area and a standard height. When the horizontal scroll bar is enabled, it is displayed within the last row of the Paging Area, and as a result reduces the number of rows that can be displayed in the grid by one.
Scroll Extent
The horizontal scroll bar enables you to scroll the Paging Area to the left until the right most part of the right side column is visible. When the scroll bar is moved to the right it does not scroll the view further than the left most side of the left side column.
Edit Modes
The scrolling operates in the same manner in all modes of operation: Lookup, Change, Add and Delete.
Click here to learn how to enable the horizontal scroll bar in a Property Sheet.
Click here to learn how to enable the horizontal scroll bar in logic.
Lock Columns
You can also lock a column on the Paging Area. When you lock a column, it stays in place and the other columns to the left of it are also frozen, and you can then use the horizontal scroll bar to scroll across to view the unlocked columns. The scroll bar is not displayed at the bottom of locked columns, instead a padlock icon appears to indicate that the column is locked. In addition, when records are expanded, the expanded area immediately below the locked columns does not scroll.
You can enable the functionality by selecting the column on the Paging tab of the Paging Screen Cycle Properties window, in the Open Client section. Alternatively, you can enable it in logic by using the LockColumn property.
Click here to learn how to lock a column in a Property Sheet.
Click here to learn how to lock a column in logic.
Column Header Text Properties
There are numerous properties that can be configured for column headers inside a Paging Area, and they are maintained against a variety of Object Types. You can change the font and font colour, embolden, italicise, strikeout or underline text, change the alignment and the background colour of the header independently of the main column area. They can be set on a per column basis, affording greater control over the appearance of the column headings.
Click here to learn how to configure column header text properties in a Property Sheet.
Click here to learn how to configure column header text properties in logic.
Configurable Sort Columns on a per Column Basis
Sorting
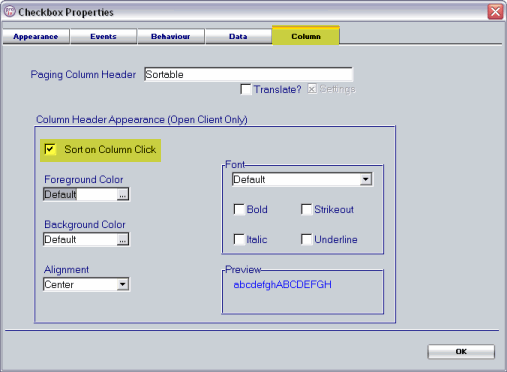
You can also turn on sorting for a particular column by using the HeadingSortOnColumnClick property in logic, or by selecting the Sort on Column Click flag on the Column tab of the Property Sheet of the object. This means that when you click on the column in the Paging Cycle, the paging data is sorted based on that column. Columns with the capability of being sorted (HeadingSortOnColumnClick property enabled) are denoted by greyed out downward pointing icon, sorted columns are denoted with a non-greyed out pointing icon which points up or down depending on the current sort order.
This provides fine control over which columns can be sorted. Setting sorting at the Paging Cycle level means that any column can be sorted, setting sorting at column level means you can configure sorting on a per column basis.
Click here to see a screenshot of an object's Property Sheet with the sorting enabled.
Click here to learn how to configure column header text properties in a Property Sheet.
Click here to learn how to configure column header text properties in logic.
Resize Columns
You can resize columns of a Paging Area in a browser if the Resizeable check box is enabled on the Smooth Page tab on the Paging Screen Cycle Properties window for the Paging Screen that you want to deploy in Open Client. With the property enabled, when you hover over the right edge of a grid heading, the mouse pointer changes to the column resize graphic, for example: When the mouse cursor changes, you can click and drag the column width to be wider or narrower, and then release the mouse to accept the change.
 |
Note: The graphic may differ depending on the version of operating system, browser and user preferences. |
Click here to learn how to resize columns in a Property Sheet.
Click here to learn how to resize columns in logic.
Remember Settings
The Remember Settings functionality is only implemented in Open Client when the browser meets the following minimum versions or higher (it must support the Web/DOM storage features), these are:
-
Internet Explorer v8
-
Mozilla Firefox v3.5
-
Google Chrome v4
-
Apple Safari v4
Items that can be saved are settings that alter the appearance of the Paging Area, and in addition to settings which may be already stored, such as column width and details of locked columns.
 |
Note: The settings are saved against the machine and not against the user. |
Data Loading Hourglass
When data is loaded into a Paging Area, an animated icon appears to indicate that the system is busy.
Cut, Copy and Paste
You can select multiple cells from a variety of rows and columns in the Paging Area, and copy the sub-set of data into a compatible application such as Microsoft Excel or Windows Clipboard.
CANCEL_ADD
The CANCEL_ADD() is a new Logic Verb that enables you to cancel out Add mode even if there are mandatory fields in the row. It returns you to Navigation mode regardless of whether you are before or after the Last Read Field. The current record addition is aborted. However, records already committed by the Add operation are not lost. Please note that CANCEL_ADD() only works in Paging Cycles and in Add Mode.
Click here to learn more about the CANCEL_ADD() property.
Topic ID: 800089


