EasiMigrate |
DEVELOPER |
EasiMigrate |
DEVELOPER |
The EasiMigrate Utility streamlines the process of upgrading source files from older PROIV versions to target files in newer PROIV versions.
Key Features
Processing
This utility ensures a secure, efficient and transparent migration process, minimising risks and ensuring compatibility with newer PROIV versions.
In the event of any errors occurring, all issues will be logged, and the migration process will be halted.
N.B. The Migrator can only be executed once per clean environment. If the process needs to be repeated against the same target environment, it must first be cleansed by exporting a developer.out file into an empty folder to reset the environment.
N.B. EasiMigrate effectively handles discrepancies in physical page size by presenting a consolidated view of any affected files. This view highlights key details and displays the page size differences between your source and target folders. At this stage, you have the option to align the target folder’s page size with the source or proceed by ignoring the discrepancies.
For optimal results, we recommend aligning the page sizes to maintain consistency. This alignment can be easily achieved using the iscr command. For further guidance, please refer to the relevant help topic on this command.
Entry Details
The screen (see image below) has the following data entries:
|
Field |
Description |
|
Migrator Boots |
This is display only and holds boot folder/directory of current version developer you are running. |
|
Source Boots |
It is mandatory. This allows entry of a Source folder/directory either by keying in the details or selecting from a drop down window. It must be different to the Migrator Boots and the Target Boots folder/directory. It must be a version of PROIV prior to the target version of PROIV. |
|
Target Boots |
It is mandatory. This allows entry of a Target folder/directory either by keying in the details or selecting from a drop down window. It must be different to the Migrator Boots and the Source Boots folder/directory. It must be a version of PROIV after to the source version of PROIV. |
|
Migration Type |
Selection allows either all files or all objects to be migrated. Files: Migrates all bootstrap files in their current state from the source folder, ensuring that all relevant files are transferred as-is. Objects: Migrates the essential development objects required to initialise the target development environment. A bulk build is recommended post-migration to regenerate non-object files in the target environment, ensuring consistency and optimising the bootstrap footprint. During a bulk build, any non-object files will be regenerated in the target environment to ensure consistency. |
|
OK |
Click OK will start the migration process. |
|
Cancel |
Exits the screen back to the Tools tab. |
Migration Process
Click the Tools tab, on the System Administration Tools, click EasiMigrate.
The EasiMigrate screen appears.
Successful validation allows the migration process to continue. N.B. A lock is applied to the source and target environments to prevent any access while the migration is in progress.
To migrate source boots from an earlier version of PROIV to a later version, do the following:
Enter a valid source boots folder/directory by either entering the details manually or selecting from the drop down window.
Enter a valid target boots folder/directory by either entering the details manually or selecting from the drop down window.
Click the migration type required for either objects or files.
Click OK. N.B. Click Cancel to stop the migration process and return you to the Tools tab.
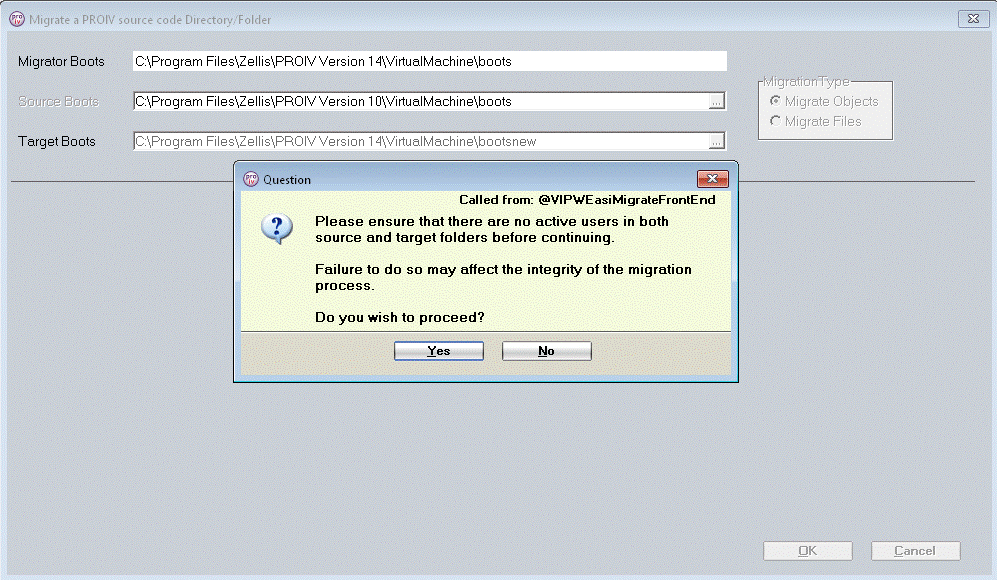
A window will pop up to verify that no active users are accessing the source or target folders. Click Yes to proceed with the migration. Click No or 'X' to cancel the migration. N.B. No or 'X' will take you back to the screen with all details preserved.
Yes.
The validation process ensures the files in both the target folders are in an expected state. In the event of any errors occurring, all issues will be logged, and the migration process will be halted.
Successful validation allows the migration process to continue.
Details of the files being processed and/or any validation errors will appear in the screen area below the data entry area.
The migration process will run. When it completes a message appears to indicate success or failure. If a failure occurs on any file the the whole run is aborted and migration does not occur.
Log files are produced and can be scrutinised it the end of the migration process:
If successful a run number, date and time stamped log file is produced, named migration_log_run_#_yyyymmddhhmmss.log - # is a 3 digit run number.
If unsuccessful a run number, date and time stamped error log file is produced, named migration_errors_log_run_#_yyyymmddhhmmss.log - # is a 3 digit run number.
Topic ID: 501130