Paging Area Dynamic Resizing Overview |
Open Client Administration |
Paging Area Dynamic Resizing Overview |
Open Client Administration |
In order for Paging Areas to be redrawn in the Open Client, the PROIV Virtual Machine sends the number of rows determined by the PagingMaxHeight property when sending the data for the visible rows. The client displays the number of whole rows determined by the current height of the Paging Area. If a partial row is required at the bottom of the Paging Area, the size of the Paging Area is reduced so that the height is an integral number of rows. If the Paging Area is then resized, the client has the required row data available to display the additional rows.
When you press the PAGE UP or PAGE DOWN keys, the PROIV Client requests the next page of data and the PROIV Virtual Machine returns the number of rows specified by the PagingMaxHeight property starting with the record to be displayed at the top of the next page. The client stores all the data and reacts to any resizing of the Paging Area by displaying enough rows to fill the current size of the area. For example, if 10 rows (1 – 10) are displayed and the Max Height is 30, pressing the PAGE DOWN key prompts the client to request rows 11 – 40 from the PROIV Virtual Machine and display rows 11 to 20.
To control the amount of data that displays on each report page, you can reduce the paging area. However, the top row in the paging area is always visible irrespective of the paging size; that means if the selected field is in row number 5, you can still view 1-10 rows. In case, the selected field is in row number 15 and the paging area is reduced, it ignores the paging size and displays 1-15 rows. That means, the top row and the selected row are displayed by default irrespective of the paging size.
Warning: Take care when configuring the PagingMaxHeight value as setting it too high may add a significant overheard to the data transferred between the PROIV Client and PROIV Virtual Machine during the page up and down operations performed in Paging Areas. |
When on row 1 in a Paging Area, clicking the DOWN ARROW moves down row by row until the bottom of the visible page is reached. On the last row, the DOWN ARROW works in the same way as the PAGE DOWN key. The same behaviour is exhibited when using the UP ARROW. (This also applies to the UP and DOWN ARROWS on the keyboard.)
The Application Property turns on autoresizing for all of Paging Areas.
AUTORESIZEPAGINGWIDTH and AUTORESIZEPAGINGHEIGHT - setting the property to TRUE turns on resizing for ALL Paging Areas in the X and Y axes respectively.
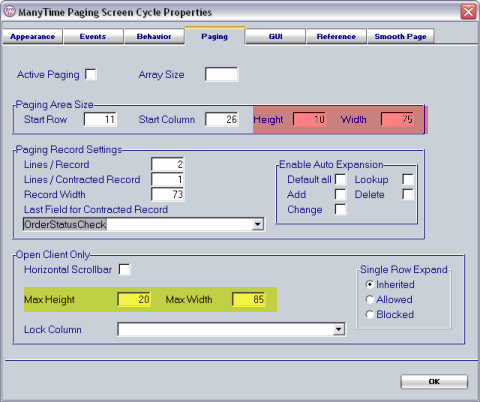
To enable the resizing of an individual Paging Area when the Application property is enabled, set the maximum height and width (Open Client Only) values to be more than the Height and Width field values on the Paging tab on the Paging Screen Property Sheet.
For example, to turn on resizing for a Paging Area, enter the maximum height and width of the Paging Area in the Open Client section (highlighted in yellow in the example screenshot). This determines the maximum width and height that the Paging Area can be resized to in rows and columns. The values must be greater than the height and width values (highlighted in red in the example screenshot) for resizing to occur.
Click herehere to view an example screenshot.

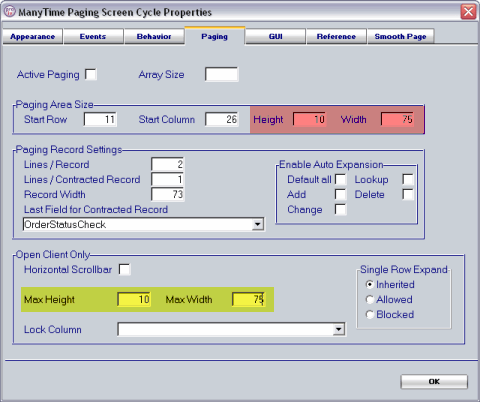
To disable resizing for an individual Paging Area when the Application Property is enabled, set the maximum height and width values to match the height and width values on the Paging tab on the Paging Screen Property Sheet. If the maximum height and width values are not set or set to zero, then the Application property is used to determine the resizing behaviour.
Click herehere to view an example screenshot.

Topic ID: 800090