


|
deploying base configuration |
proiv dashboard |
 |
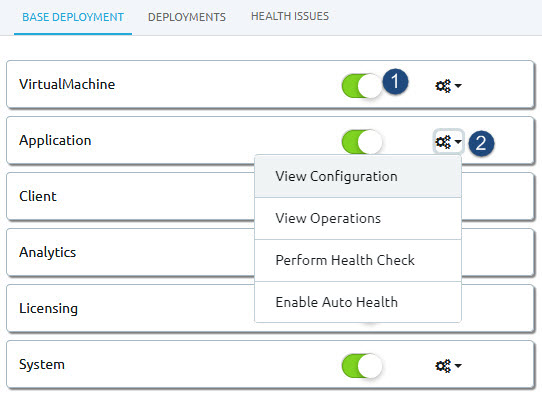
The Base deployment page is the default viewer of PROIV Dashboard that comes with the PROIV installation. It displays all the components of 'default' profile from Base configuration and provides an ability to deploy/undeploy the individual components. When initially installed, all components will be in a deployed state indicated by the deploy slider being in the ‘ON’ state.
The base deployment view is as an abstraction and simplification of the model built for the Base configuration.
Note: The properties file for base-default is automatically created with the installation and is stored in the VirtualMachine\config folder.
Base Deployment - Components
|
Action |
Description |
|
|
By default, all PROIV components are deployed (the slider is turned 'ON'). To undeploy a component, turn OFF the slider. This disables the component from performing any actions. If you have changed the Base configuration for any of the components and want the change to get it deployed, you must turn OFF and again turn ON the slider of the respective component. This will redeploy the component and will enable the component for performing actions. |
|
|
Displays actions that can be performed on the PROIV component in the Base configuration. View Configuration - The configuration settings page of the selected component appears with the existing values. Modify the configuration, if required and redeploy (turn OFF and then ON the slider) the component on the Base Deployment page to take the changes into affect. View Operations - The operations page of the selected component appears. The operations that operate on that deployment are displayed. For example, OpenClient services for a client connector deployment. Perform Health Check - A manually instigated health check that is performed immediately against this deployment and displays result in health checks dashboard page. The Health Check Response page appears with the following details: Configuration : <deployment name (configuration name-profile name)> for example, base-default Container : <services name> for example, Client Status : <status message> for example, success Enable Auto Health - Enables automated health check. This will automatically instigate health check and displays result in HEALTH ISSUES dashboard page. The slider is highlighted in orange to represent that health check is in progress. The slider is highlighted in green to represent that health check is successful. Disable Auto Health - Disables health check. The slider is highlighted in blue to represent the component is ready for deployment but the health check is disabled. |
 Slider
  Actions
 Topic ID: 900004